|
Writing
Stages 101 |
| Top Menu | Preface | Outline | Do's/Don'ts | Tricks Of The Trade |
Props | Stage
Examples One Two Three Four Five |
Stages can be prepared with a graphics program, a word processor or
written by hand.
No matter how you produce them, they all will need the same
attention.
Stage design is one of the most important aspects of a Cowboy Action
Shooting match.
It is, after all, the initial reason we go to the match.
Poor stages can make or break a shoot, create safety
issues,
will delay a match or cause a backup, and complicated designs
can frustrate shooters because they
become "Procedural Traps." Properly written
stages are a lot more than just picking targets, making up a shooting
order
and choosing a prop or two.
Stages can have a wide variety of activity and shooting. The more complex
the stage, the longer it will take to shoot.
An annual or large match (150
plus) would suffer if stages were too lengthy. Complicated stage directions
make it more
likely there will be a high number of procedural penalties.
Clear, easy stage directions are a must. All potential questions must
be anticipated and addressed in the stage description.
Be precise. Where
to start, what position to be in, where the hands are, shooting and firearm
order, where to place
the empty firearm, any motion, all verbals and when
to speak. Also include if make up shots for shotgun are permitted
and any
local special rules. Remind shooters, in the description, if there are
safety items to be aware of.
The format of the stage directions should be uniform from stage to stage
and flow from beginning to end.
We will review a proven format and explain
why it works.
SAFETY is number one, fun is
second. Do not compromise safety for any reason.
We will cover the do's
and don'ts later. If at all possible, have your club
safety officer check the stages for potential
safety issues.
What looks good on paper might
not be safe after it has been set up in real
life.
Participants will be from 12 years old to 80 plus. Some are short and
others are tall.
Many are seniors and cannot participate in an all day marathon
of running and climbing.
Keep the stages fun for all potential shooters.
Good stage design also balances the stages, as much as possible, for all
shooting categories.
For annual and large matches, keep the shooting and movement equal between
all of the stages.
A big backup on one stage can really mess up a great
match.
The stage writer must be familiar with the club rules, targets available,
props on hand, range layout,
safety issues of
the range and the amount of help available for set up and tear down.
Some
ranges must use a common firing line and cannot have any movement
downrange.
| Return To Stage Writing Menu | Return To Top Menu |
Preparation of the stages
Graphics program
Word Processor
Hand written
Stage writer
Must be familiar with local club safety rules
Know the range layout for each stage
Have a target and prop list
Helpful if RO I and RO II proficient and has a copy
of the SASS Match Directors Guide
Writer should have the ability to be creative
Must be able to accept creative criticism
Elements of a good stage design and format
Round count
Story line
Stage location of each forearm
Starting position (hands included)
I'm ready signal
Not complicated
Balanced for all shooting categories
Is generally the same length as the other stages
Does not hinder shooter for being short, tall, young, old, male or female.
Consistent format of design for all stages
Target placement close
Safety
Make sure the stage does not create a safety problem for the shooter.
Make sure the stage does not create a safety problem for posse workers, RO or the public
Always be alert for potential safety problems.
See Do's and Don'ts
Stage Review
Review stages with club safety officer or match director
If possible, perform a walk through of the stages after set up
Have posse walk through review of the stages for consistency and safety issues
| Return To Stage Writing Menu | Return To Top Menu |
* Do not have shooter movement up range. It is to easy to break the 170 when coming back toward your posse.
* If your range has uneven
or poor footing, have limited or no movement.
* Do not stage a shotgun loaded.
* Do not design a stage where the shooter
must use a "House Gun" as part of the shooting scenario.
* Do not design a stage where the shooter
must go up or down a flight of stairs as part of the stage movement.
* Never permit drawing or holstering a cross draw holster while seated.
* Never move with a cocked
gun. Some movement with a rifle (with the hammer on a spent round),
is OK
but discouraged. It is a safety in the making. You will answer 20 posse questions
about how they are
supposed to do that properly.
* Do not design a stage
where the shooter is firing from an unstable platform, moving bridge or any
prop that is
not stable enough to support any shooter during the course of
shooting.
* Limit kneeling and do not have a shooter start laying down. Never have a shooter lying down with holstered guns.
* Never design a stage
that can jeopardize a spotter or posse worker. Everyone should be visible
to the RO.
This is a challenge on some building fronts. If there is no way
around it, specific safety warnings should be
included in the stage description.
* Do not put targets at harsh
angles from the shooter.
If necessary, have a different shooting position
so the shooter can be directly in front of the targets being
shot.
* When you do have movement, be specific about drawing, loading or
handling firearms before they get to the
shooting position.
* Anticipate potential questions. If your description of a stage generates
questions from the posse,
it will add time to the stage. So, address items
in detail. Where, when, which direction, how and how many.
* Keep shotgun rounds no more than 6 and do not do that on more than
half of the stages.
Four is ideal but a few 6 shot shotgun stages are OK.
This is easier on young folks, seniors and the ladies as well as a BIG time
saver.
* Do not have a five shot pistol reload. At the most, load one more rifle round.
* Keep movement laterally, toward the unloading table.
* As a writer, you must put your "intentions for the stage" into words
so that everyone will understand
your intentions. Writing must be very concise.
It should include the exact staging location of all firearms.
If it is the
intent of the writer to have the rifle on the right side of the buckboard,
then is should say that.
If it says "In the buckboard," then it can actually
go anywhere in the buckboard.
If you do not want the shooter to start with
a hand on their pistols, you must be specific as to where they go.
"Both
hands flat on the table" will do that.
If the writer starts a stage off by saying "Shooter starts behind the
buckboard by their rifle.
At the buzzer, pick up your rifle." If you don't
want the shooter to hover over the rifle like a vulture with their
claws
out you need to be more specific. Have the shooter hold something with both
hands or have their hands
on their hips, touching their hat or resting on
the pistols.
* Balance shotgun targets for 97 Vs double barreled shotguns.
Have some
shotgun target next to each other for the double folks and some separated
for the pump users.
* Have most stages (but not all) with the pistols back to back.
This
makes a stage fun for the Gunfighters and easier on the memory for the rest
of the folks.
An occasional split handgun stage is great for variety
only.
* Be specific on gun staging. Be equally specific as to where they go
when you finish with them.
This is important when pistols are staged outside
of the holsters.
If the intent is to holster the pistol when finished, say
"Holster the pistol and....."
* Do not make the stage a marathon run. Movement is part of the game
however, short distances are better
on the shooter, RO and spotters.
* Do not design complicated shooting sequences. It will cause procedurals,
and lots of questions.
As each shooter comes to the line, they will ask the
RO over and over what the sequence is.
This can really slow down a big match.
It has the potential to double the time the posse takes to shoot the
stage.
* On a stage with a building front, design the stage so that spotters can see the targets.
* Do not end a stage with the rifle. Especially if you are shooting
it through a store window or doorway.
Many timers will not accurately pick
up the shots from rifles with our lighter loads.
* Do not design a stage where "Luck" will have an effect on the time
it takes to shoot the stage or change the
difficulty of the stage. For example,
drawing an Ace from the deck should not allow the shooter to skip a target
or to shoot an easier target.
* Consider right and left handed shooters. Have duel gun rest, whenever possible,
so the shooter has a choice.
| Return To Stage Writing Menu | Return To Top Menu |
* After you complete the stage writing, review each stage for round
counts, placement of all firearms, starting
position (including the hands),
where to put empty firearms, spelling, grammar, props needed, target placement,
safety concerns and flow through the course
of the action.
* Whenever possible, mirror the pistol sequence with the rifle sequence.
If the rifle is a double tap sweep left to
right, then make the pistols a
double tap sweep left to right. This tip alone will make your shooters come
back
next month. Target sequences, that are symmetrical in some way, are
easier to remember.
Try not to call everything some sort of sweep. Out of
town folks may not understand.
A stage that has the rifle left to right, one pistol right to left,
another pistol Nevada sweep and the shotgun
center - center - outside - outside
is NOT fun. It will result in procedural after procedural.
It can make many
shooters decide to stay home next month.
* Have the shooter say a short line before the buzzer to indicate when
they are ready.
This is a real time saver! At a big shoot, have the line
posted at the actual starting position for the stage.
* Avoid lines and lines after the buzzer.
* Have stage movement go toward the unloading table. It will speed things up.
* If you can go downrange to reset poppers or clay birds, it takes a
little extra time.
Use of reset cables can speed things up.
* Things that add time are reloads, more than four shotgun rounds, movement,
complicated stage instructions,
having to get up from a kneeling or sitting
position on a horse and getting free from ropes or handcuffs, to
name a few.
Individually they are doable but when you combine several together, you are
going to have a backup on that stage.
* Format the stage instructions with the round count at the top, along
with the stage title.
Next have a drawn layout of the stage with the targets
and major prop placement along with the location of staged guns.
Below that,
have the story line (keep it fun but brief). Next, write the round count
and staging location for each firearm.
Next paragraph should tell where the
shooter begins and the starting position for their hands.
Remember, if you
don't say where the hands start, they can put them anywhere, including on
the first gun.
Next have the ready to shoot line. Finally, the shooting sequence.
Show the shot placement under each target when
there is a specific order.
* Whenever possible, have long gun staging that is flexible for left hand and right handed shooters.
* After your stages are written, go over them for
safety. Then go over them for clarity and
description of your intent.
Then try to anticipate what another shooter
might have a question on.
Whenever possible, have someone else check them
over as well. After looking at them for a long time, it is real easy
to miss
some items that are actually very obvious to new eyes. The three most often
asked questions on the stage
are "What is the round count?", "What am I supposed
to say?" (Put the phrase, in italic bold letters to make it easy to find)
and coming in a close third is "Where can my hands be?"
* If your club is short on targets, you can design a stage with forward
movement between the pistol and rifle rounds.
You can shoot distant targets
with the rifle, then move forward and shoot the same targets with the pistols.
| Return To Stage Writing Menu | Return To Top Menu |
* Simple everyday items can make excellent props.
They also provide
a place for the hands to be prior to the start of the stage.
* Consider yard tools as farm tools. Rakes, wheel barrel, shovels,
pitchforks, spades, saws, picks, rope, buckets,
lanterns and hammers make
great props and they are readily available.
* Additional household items are equally attractive for props. Pots,
pans, plates, barrels, boxes, straw bales, cards,
poker chips, dice, card
table, chair, wash pan, musical instruments, whiskey bottle, shotglass, basket,
dinner bell,
fake dynamite, money and money bags, saddlebags, coffeepot and
water bucket are all easy to obtain and inexpensive.
* As your club grows, it can make or purchase additional props like,
store fronts, portable split rail fence sections,
saddle for horse etc..
* When constructing a permanent store front, consider the
safety of the building.
Also consider visibility
for the spotters and RO.
* Do not use props that are heavy, sharp, will get in the way when dropped or make the shooters hands wet.
| Return To Stage Writing Menu | Return To Top Menu |
Square Square Square Pest Pest Pest Pest Cowboy Cowboy Cowboy
Table,
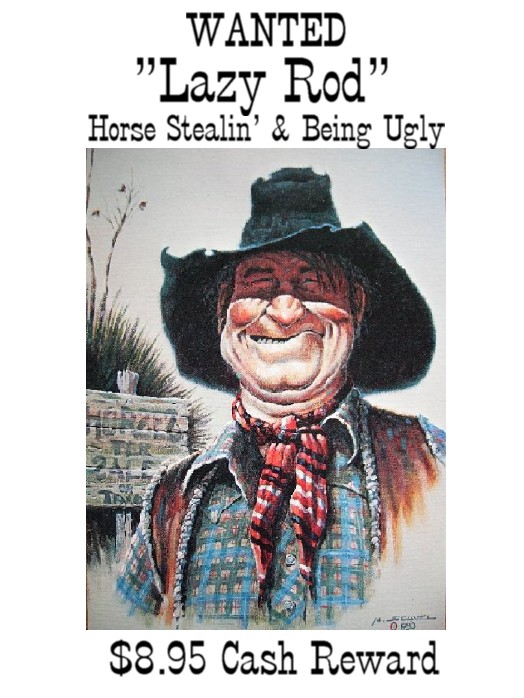
Poster There has been a territorial warrant issued for the arrest of one of your townsfolk, and you want the reward money. It seems Lazy Rod, has an unknown past. Lazy Rod gave the thumbs up to hang Chuckaroo, and that is a no no. He won't go easy, his gang of hangman are there to protect him. Yet another, Chuckaroo true story.
Pistols loaded with 5 rounds each and staged on the table with hammers
resting on empty chambers. Shooter starts standing at the table with the warrant chest high, in both hands. When ready, say "Lazy Rod", I'm taking you in!"
At the buzzer, set the poster down. Shooter picks up their rifle
and shoots the three rifle targets with ten rounds, in any order, except
no more than a double tap is allowed. Put the empty rifle back on the table,
action open and cleared. |
| Return To Stage Writing Menu | Return To Top Menu |
After chasing the desperados for three weeks, you have finally run them down.
Pistols loaded with 5 rounds each and holstered with hammer resting on
an empty chamber. Shooter starts standing behind the rest with their rifle mounted on their shoulder, not cocked, but ready to. When ready, shooter says "Look out for the sun in your eyes!"
At the buzzer, shoot the left square twice, the next two squares
three times each and then two rounds in the far right square. Place the empty
rifle back on the rest, action open and cleared. |
||||||||||||||||||||||||||||||||||||||||||||||
| Return To Stage Writing Menu | Return To Top Menu |
Turkeys have been a little scarce so you choke the chicken hoping it will turn into a turkey? I don't think so.
Pistols holstered with 5 rounds each, hammer resting on an empty
chamber. Shooter starts at position one, holding the chicken around the neck, with both hands. When ready, say "You are a turkey, dag nab it!"
At the buzzer, set the chicken down on the box. Draw your pistols,
per your shooting category, and shoot the inner left cowboy twice, the far
left cowboy three times, then the inner right cowboy twice and then the far
right cowboy three times. Holster, then move to position two. |
||||||||||||||||||||||||||||||||||||||||||||||||||||||||||
| Return To Stage Writing Menu | Return To Top Menu |
Why would anyone be afraid of an old pig?
Pistols loaded with 5 rounds each, holstered with hammers on empty
chambers. Shooter starts at position one with their one pistol drawn (not cocked) and pointed at the cowboy. When ready, say "I ain't afraid of no pig!"
At the buzzer, shoot the left cowboy five times and holster.
CAUTION: HOLSTER BEFORE TURNING AROUND AT POSITION 4 |
||||||||||||||||||||||||||||||||||||||||||||||||||||||||||||||||||||||||||||||||||||||||||
| Return To Stage Writing Menu | Return To Top Menu |
Little Cookie is missing and so is all of the food.
Pistols loaded with 5 rounds each and holstered with hammers resting on
empty chambers. Shooter starts standing at the rear of the wagon holding the pan in one hand and their other hand scratching the back of their neck. When ready, shooter says "Has anybody seen Little Cookie?"
At the buzzer, put the pan in the wagon. Draw your pistols,
per your shooting category, and shoot the left circle once, the middle circle
three times and the right circle once, then repeat the same sequence. Holster
and pick up your rifle. |
| Return To Stage Writing Menu | Return To Top Menu |
POSTER
|